
Key Takeaways
- A 360° drone inspection captures clear, high-resolution photos of every slope, valley, and penetration on your roof in 15–20 minutes of flight time — including steep and hard-to-reach areas, with no one climbing a ladder or walking on the roof. You get a straightforward report with photo documentation and a clear written quote.
- Drones are better than ladders for the scan: faster, safer, fully documented, and they don’t scuff your shingles. A short ladder walk is still useful for hands-on confirmation of flashing details and anything the drone flags.
- Drone imagery is accepted by most major insurance carriers as supporting evidence on storm and hail claims. It doesn’t replace the adjuster — it gives the adjuster something specific to verify.
- A drone can’t see under shingles, inside flashing joints, or into your attic. Treat the scan as the start of an inspection, not the whole inspection.
- In Massachusetts, the best inspection windows are dry, calm days after snow has melted off the roof. We can fly in cold weather; we can’t fly in sustained wind above ~20 mph or through accumulated snow.
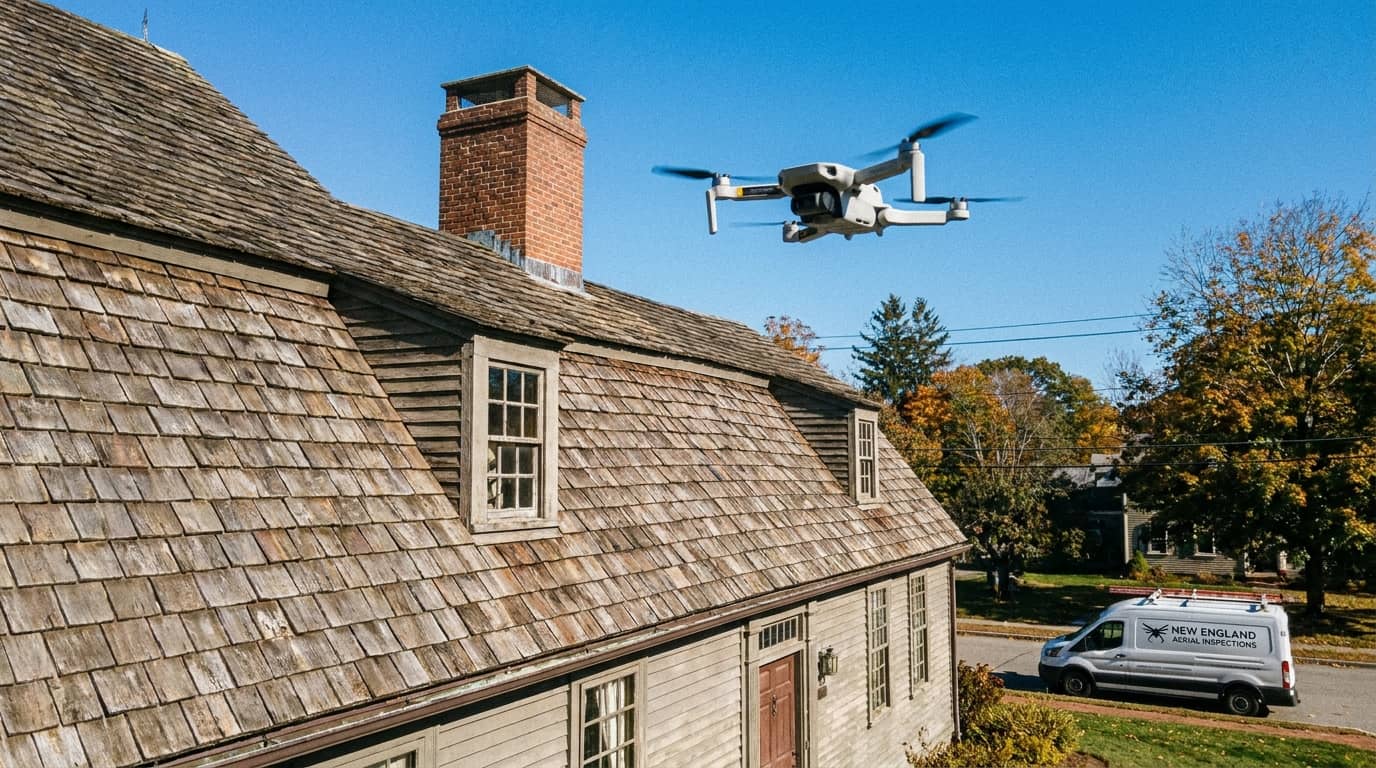
What a 360° drone inspection actually is
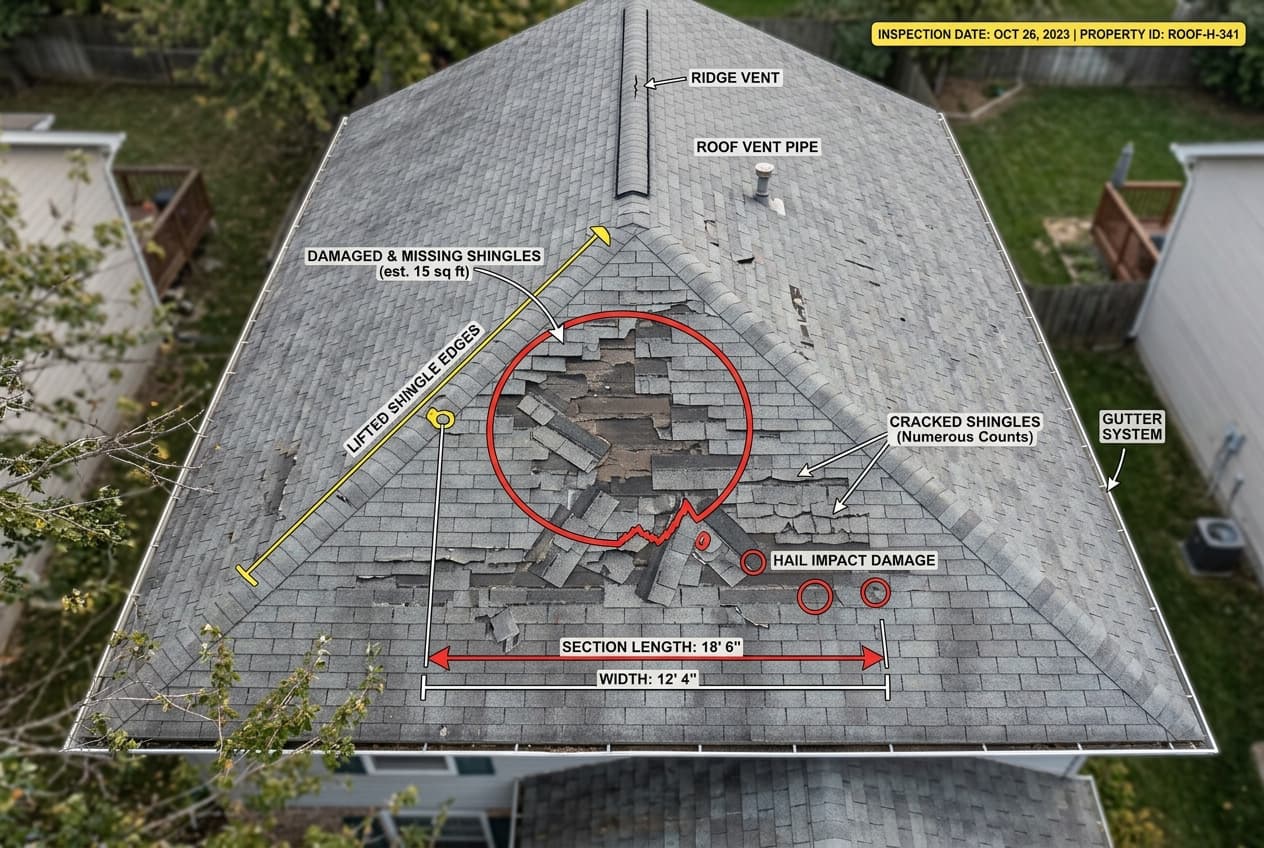
A 360° drone roof inspection is a structured aerial scan of your entire roof using a commercial drone, followed by software processing and a written report. The “360°” refers to the coverage — every slope, every valley, every ridge, every flashing point, every penetration, photographed from multiple angles. Not just the front-facing slopes the previous owner could see from the street.
The drone does the part that used to mean a ladder. It follows a flight path that captures clear, high-resolution photos of the whole roof from every angle — including steep and hard-to-reach areas — with no one climbing a ladder or walking on the surface. That keeps the inspection safe and lets us see slopes that a ground-level look or a quick ladder check would miss entirely.
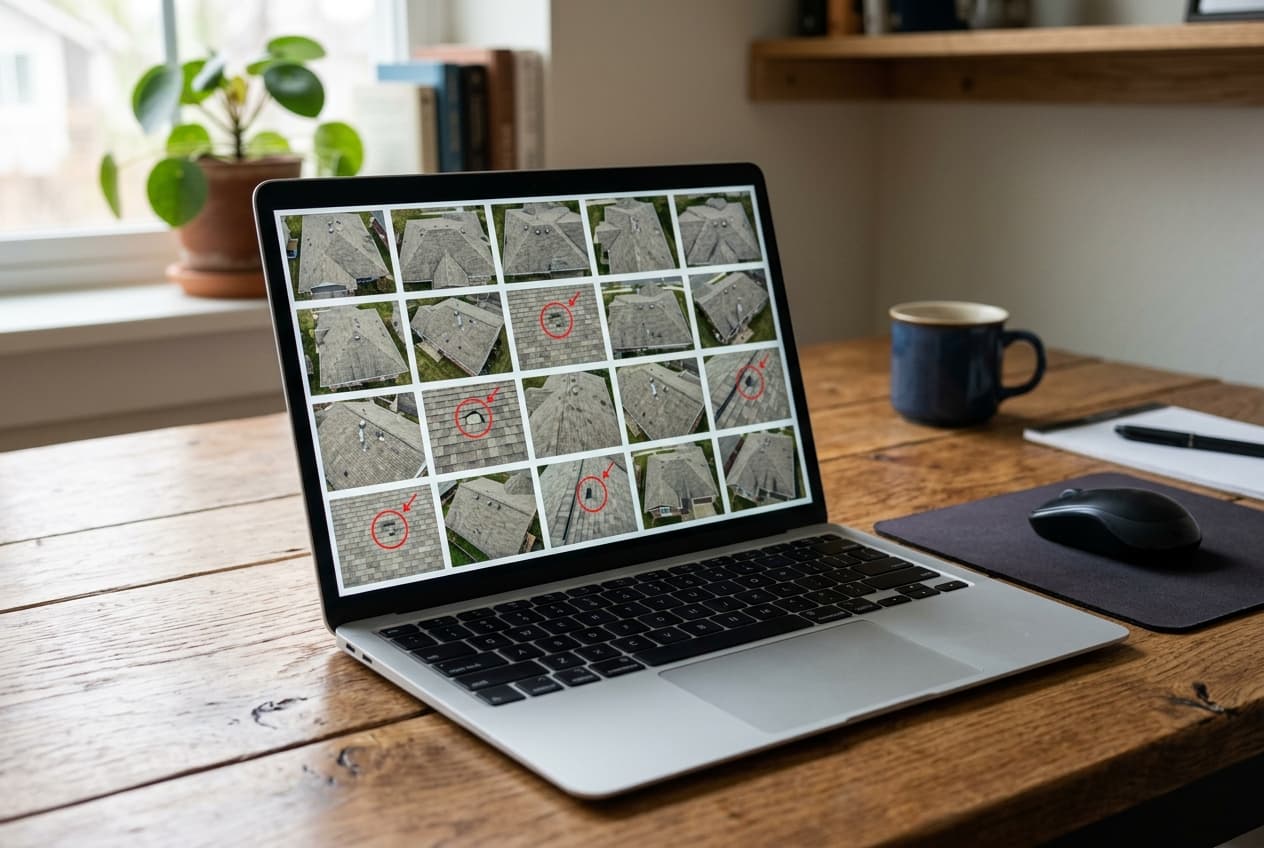
From there, AI-enhanced analysis helps review the imagery and flag problem spots for a roofer to confirm. The software is a first pass, not the final word — a trained eye still goes through the photos before anything lands in your report.
What you end up with is a straightforward report built around photo documentation: it shows what’s going on with the roof, what’s urgent, and what can wait, alongside a clear written quote. The photos are dated, so months later — or in front of an insurance adjuster — you can point at a specific spot and show what was there. A handwritten note from a ladder walk doesn’t do that.
Drone vs ladder walk vs satellite estimate: which is right for you?
These three methods get talked about as if they’re interchangeable. They’re not. Each has a job it does well and a job it does badly. (If you’re wondering whether the drone part holds up, we cover whether drone roof inspections are accurate and reliable in its own piece.)
| Method | Best for | Limitations | Typical time on site |
|---|---|---|---|
| 360° drone scan | Full-roof condition reports, post-storm documentation, insurance claim evidence, baseline records, steep or complex roofs, anything where you want a permanent file. | Can’t see under shingles, inside flashing joints, or into the attic. Grounded by snow on the roof, heavy rain, fog, or sustained wind above ~20 mph. | 30–45 minutes |
| Ladder walk | Hands-on confirmation of flashing, fastener pull, soft decking, attic-side checks, and any spot the drone flagged that needs a closer look. | Slow on large or steep roofs. Foot traffic loosens asphalt granules on aging roofs. Limited by what’s safely accessible. Documentation is whatever the inspector writes down. | 1–2 hours |
| Satellite / aerial imagery | Rough measurement for budgeting, neighborhood comparables, ballpark estimates before you commit to a site visit. | Image age varies (often 1–3 years old). Resolution can’t resolve granule loss, lifting tabs, or hairline cracks. Useless for damage assessment. Should never be used as the basis for a final price. | None — desktop only |
The honest answer for a typical Massachusetts home is that the best inspection is a drone scan plus a short ladder check on anything the drone flagged. The drone gives you the documented record; the ladder confirms what the documented record means in practice. Satellite imagery has a place for early budgeting but should never be the basis of a quote on its own.
“The biggest shift since drones got good is that we stopped guessing about the back side of the roof. On a Colonial with dormers, a steep main pitch, and a chimney tucked into a valley, half the roof used to be inferred. Now we see it.”
Global Roofing field team — based on inspection notes from MA homes
The process, step by step
Here’s what actually happens from the time you book a 360° inspection to the time the report shows up in your inbox. Our inspection is free — and if you’re weighing that, here’s when roof inspections are free and what one should include.
- Initial call (10 minutes). We confirm the address, ask what prompted the inspection (storm, leak, pre-listing, just curious about age), and schedule a window. If you already have an active insurance claim, we ask for the claim number and adjuster contact so the report can be tagged accordingly.
- Pre-inspection prep. No prep required on most jobs. If your yard has trampolines, large patio umbrellas, or freshly hung laundry, we ask you to clear them — they affect the drone’s flight path. We won’t schedule in active rain, snow, or high wind.
- On-site flight (15–20 minutes). The pilot arrives, walks the perimeter, sets the drone’s flight boundary, and runs the automated capture. You don’t need to be home, but most homeowners are — it’s a good moment to ask about anything specific you’re worried about.
- Office processing. The photos upload and a senior inspector reviews the imagery with help from the AI-flagged items, sorting what’s urgent from what can wait. Borderline calls get a second set of eyes.
- Report delivery. You get a straightforward report with photo documentation that shows what’s going on with the roof and a clear written quote. It stays on your account so you can share it with an insurer or another contractor.
- Follow-up review. A roofer walks you through the report — in person, on a video call, or by phone — and answers questions. If the roof needs work, you get a clear written quote at the same time. If it doesn’t, you get that in writing too. No sales pressure.
Not sure if you need an inspection yet?
Our Roof Assessment tool walks you through the visible warning signs in five minutes and tells you whether to book an inspection now, monitor for another season, or stop worrying. Free, no signup required.
Open the Roof Assessment ToolWhat’s in the report
Every 360° inspection produces the same set of deliverables. The detail level scales with the roof — a simple ranch gets a shorter report than a Victorian with five dormers and a slate porch — but the structure is consistent. For the full rundown of what a roofer checks during an inspection — surface, structure, and attic — and whether the findings can tell you how many years your roof has left, we go deeper in those two articles.
- Annotated photo gallery. Clear, high-resolution drone photos with arrows, callouts, and notes pointing to each flagged condition, covering every slope — including the steep and hard-to-reach areas a ladder check can’t safely reach.
- Urgent vs. can-wait read. The report sorts what it finds into what needs attention now and what can wait, so you know where the real concerns are and what’s only worth keeping an eye on.
- Clear written quote. A total price for the work, plus a written description of the scope and the specific materials we’d use. If you only want the report — because you’re price-shopping or working an insurance claim — you can take the photos and findings to other contractors.
- Dated photo documentation. The report and its photos are dated, so you have a record you can hand to an insurance adjuster or another contractor and point to a specific spot on the roof.
What a drone inspection can’t do
We’re going to be specific about this because the marketing around drone inspection sometimes implies it’s a complete solution. It isn’t. A 360° scan is the most thorough non-contact tool we have, but there are real limits.
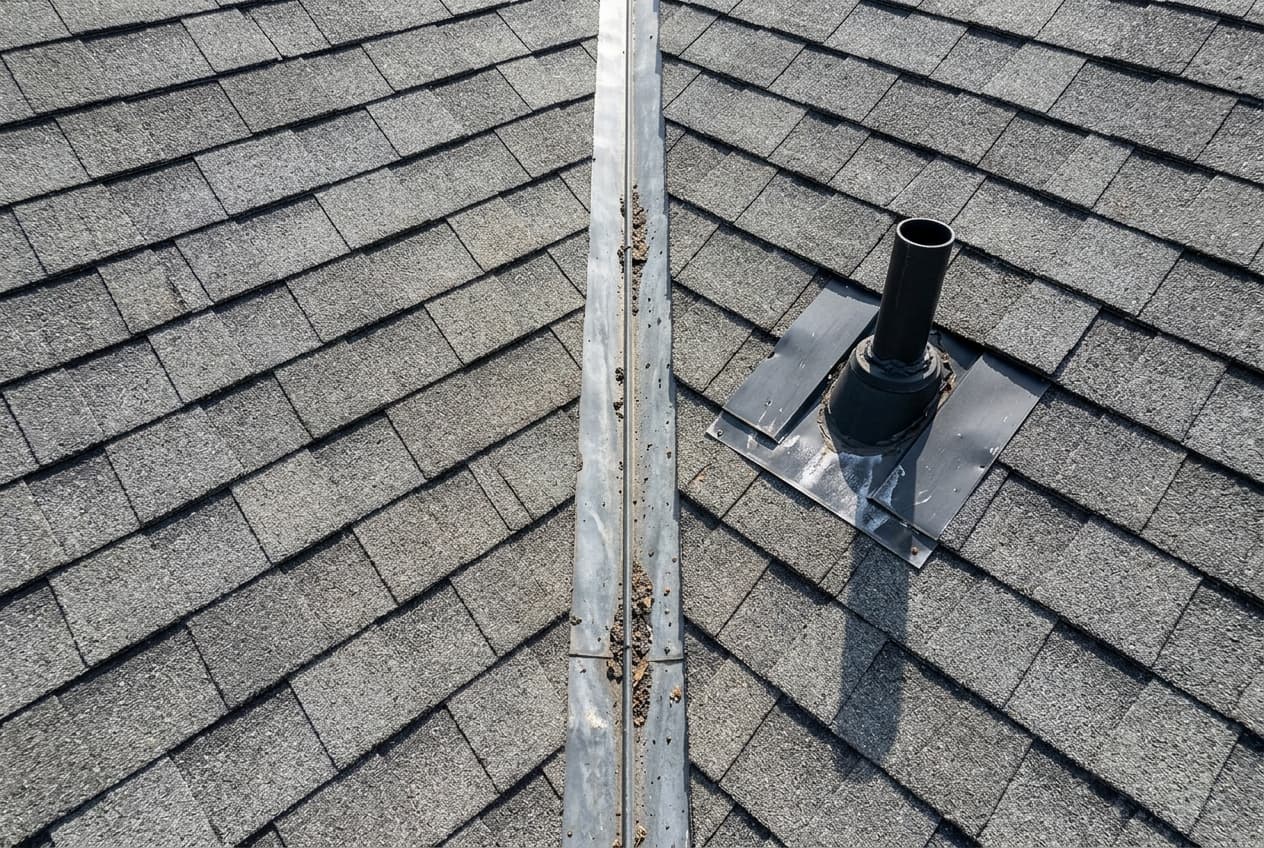
- It can’t see under shingles. The drone photographs the surface. If decking is rotted underneath, the only way to confirm is to lift a few shingles or inspect from the attic.
- It can’t feel for soft decking. A roofer walking the surface can feel a spongy spot under their boots that the drone can’t see from above. This is one reason a short ladder walk on flagged areas matters.
- It can’t inspect inside the attic. Insulation, ventilation, framing, daylight visible through the deck — these are attic-side findings. We do them separately on the same visit when access is available.
- It can’t fly in bad weather. Heavy snow on the roof obscures the surface. Sustained winds above ~20 mph ground the drone for safety. Dense fog or active rain stops the flight.
- AI flagging isn’t perfect. Software catches the obvious patterns. A human reviewer still catches things the AI misses — and ignores false positives the AI flags. Always confirm AI findings with a trained eye before reporting them on a claim.
None of this makes drone inspection less useful. It just means a 360° scan is the strongest starting point we have, not the entire inspection.
Using the report on an insurance claim
If you’re inspecting because of a storm, a hail event, or a suspected wind-damage claim, this is where the 360° report earns its keep. Major carriers — including the ones most common in Massachusetts — accept documented drone photos as supporting evidence. The report doesn’t replace the carrier’s own adjuster; it gives the adjuster a structured document to verify against. Insurers are also increasingly the ones asking for an inspection in the first place — here’s why your insurance company may want one.
In practice, that tends to mean fewer missed line items. An adjuster on a roof for 30 minutes is more likely to count what they see than to find something subtle. An adjuster cross- referencing a 22-page report tends to confirm everything the report flags. That changes the size of the claim.
A few specifics worth knowing:
- Timing matters. If you can document the roof before a storm season — or right after a neighborhood hail event, before any “wear and tear” argument can be made — you have stronger evidence than a claim filed weeks later with no baseline.
- Dated photos are the point. The photo documentation is what makes the report useful to an adjuster. Keep the original report and don’t edit the photos.
- Share with the adjuster proactively. Send the report when you file the claim, not after the adjuster’s visit. Adjusters with the report in hand walk the roof more thoroughly and faster.
- Drone imagery doesn’t guarantee approval. It gives you a stronger case, not a sure one. Coverage still depends on your policy, the storm, and the specific damage. Carriers can and do deny well-documented claims.
“The single most useful thing about a 360° report on a claim is that it gives the adjuster a list. People are good at verifying lists. They’re less good at finding things from scratch on a 30-minute roof visit.”
Global Roofing field team — observations from working alongside MA-area adjusters
When to book one (and when to skip it)
A 360° inspection isn’t the answer to every roof question. Here’s our honest read on when it’s worth it — and for the bigger picture, see how often you should have your roof inspected and whether you need one when buying or selling a house.
Book one when:
- You’re filing or considering an insurance claim after a storm, hail event, or wind incident.
- Your roof is more than 15 years old and you want a baseline condition record before deciding repair vs. replace.
- You’re selling the home in the next 12 months. A clean, dated inspection report is one of the best disclosures you can hand a buyer.
- You’re buying a home and want a roof condition document that goes beyond what a generalist home inspector typically produces.
- You suspect a leak but can’t find the source. A full-roof drone scan is a good starting point, paired with a hands-on look at the attic and flashing where it’s safe to get to them.
- You have a complex or steep roof — Colonial with dormers, Victorian, anything 8/12 pitch or greater — where a ladder walk can’t safely cover the whole surface.
Skip it when:
- You have an obvious, active leak with a known location and you just need it fixed. A repair-focused ladder visit is faster.
- Your roof is under 5 years old and you have no specific concern. There’s usually nothing meaningful to document.
- You’re in active winter conditions with snow on the roof. Wait for a clear, dry stretch — the inspection is meaningfully better when the surface is visible.
Massachusetts-specific notes
A few details that matter specifically for New England homeowners:
- Inspection windows. April through November is the reliable working season. Dry stretches in December–March are usable, but snow accumulation makes most winter inspections low-value. We re-inspect for free if a winter visit is inconclusive.
- Ice dam evidence. Drone imagery from late winter often shows the streaking and shingle damage from ice dam runoff — useful both for diagnosing the source and for documenting damage on a claim.
- Storm season. Nor’easters concentrate wind damage on the windward face of the roof. A 360° scan catches the back-of-house damage that ground-level inspection often misses.
- FAA Part 107. Commercial drone operators in Massachusetts are required to hold an FAA Part 107 Remote Pilot Certificate. Always confirm any contractor doing drone work — including ours — is Part 107 certified and carries drone-specific liability insurance.
- The free 360° report option. If you’d rather start with a structured inspection report we already deliver, our standalone 360° report path lets you request the inspection without scheduling an estimate appointment. See the 360° roof report details.
Frequently asked questions
How long does a 360° drone roof inspection take?
The drone flight itself takes 15–20 minutes for a typical single-family home. Total time on site is usually under an hour, including setup, a brief walkaround, and the homeowner conversation. After that you get a straightforward report with photo documentation and a written quote.
Is a drone roof inspection better than a ladder inspection?
For most residential roofs, yes — drone capture is faster, safer, more thorough on steep or complex roofs, and produces documentation you can keep on file. A ladder walk is still useful for inspecting flashing details up close, checking attachment points by hand, and confirming what the drone sees. The strongest inspection combines both.
Do drone roof inspections actually work for insurance claims?
Yes. Documented drone photos are accepted by most major insurance carriers as supporting evidence for storm and hail claims. It doesn’t replace the carrier’s own adjuster, but a thorough drone report gives the adjuster something specific to verify rather than something to find on their own. That tends to mean fewer missed line items.
How much does a 360° drone roof inspection cost?
At Global Roofing, the 360° inspection is free for Massachusetts homeowners — there’s no charge for the flight or the report, and no pressure or obligation either way. Standalone drone inspections from third-party providers usually come with a fee that varies by roof size and complexity.
Can a drone inspect my roof in winter?
It depends on conditions. We can fly in cold weather and light overcast, but heavy snow on the roof obscures the surface and makes inspection unreliable. High winds (sustained above ~20 mph) ground the drone for safety. The best window in Massachusetts is a dry, calm day after the snow has melted off — typically late March through November, plus dry stretches in winter.
What can a drone inspection not see?
A drone can’t inspect under shingles, inside the attic, or inside flashing details that need hands-on probing. It also can’t feel for soft decking. For an aging roof or a suspected leak, a drone scan is the starting point — a good inspection still includes a quick attic walkthrough and, where it’s safe, a hands-on look at anything specific the drone flagged.
Will a drone damage my roof or void my warranty?
No. A drone never touches the roof surface. That’s actually one of its advantages over a ladder walk — every footstep on an aging asphalt roof loosens granules. Drone inspection is the safest non-contact way to document a roof and has no impact on shingle warranties.
How we wrote this guide
This guide draws on Global Roofing’s field experience running drone inspections across Massachusetts homes, FAA Part 107 commercial drone operating requirements, and published guidance from the National Roofing Contractors Association on inspection and damage documentation. It was reviewed for technical accuracy by a licensed Massachusetts roofing contractor on the Global Roofing team. See our full editorial process for how we research, write, and update every guide.
Sources
- Federal Aviation Administration — Part 107 Small Unmanned Aircraft Systems (commercial drone operating requirements). faa.gov
- National Roofing Contractors Association — Roof inspection and damage documentation best practices. nrca.net
- Insurance Information Institute — Filing a homeowner insurance claim and supporting evidence requirements. iii.org
- Massachusetts State Building Code, 780 CMR — minimum roof inspection and assessment standards referenced in this guide. mass.gov